Hello SyntaxHighlighter
Hai btw what is SyntaxHighlighter ? jika anda seklain belum tahu itu wajar :P karena kalu anda sudah tahu pasti tidak akan buka blog ini kan :D.
Langsung aja ya SyntaxHighlighter menurut teoriku adalah cara menampilkan kode-kode tertentu biasanya pemprograman agar lebih eye catching, alias enak di pandang gitu lho :P.
Berikut adalah salah satu hasil dari SyntaxHighlighter kerean kan ?? :P.
package entity;

import java.io.Serializable;

public class Client implements Serializable{

 private int clientId;
 private String clientName;
 private String clientAddress;
 private String clientCity;


 public Client() {
  super();
  // TODO Auto-generated constructor stub
 }
 public int getClientId() {
  return clientId;
 }
 public void setClientId(int clientId) {
  this.clientId = clientId;
 }
 public String getClientName() {
  return clientName;
 }
 public void setClientName(String clientName) {
  this.clientName = clientName;
 }
 public String getClientAddress() {
  return clientAddress;
 }
 public void setClientAddress(String clientAddress) {
  this.clientAddress = clientAddress;
 }
 public String getClientCity() {
  return clientCity;
 }
 public void setClientCity(String clientCity) {
  this.clientCity = clientCity;
 }


}
Oke to the point aje ya yups :P tak usah bertele-tele kelihatannya anda sudah tidak sabar. Anda mau cara singkat atau sulit ?? :P kalau mau cara singkat oke lets follow the rule :P.
1. Buka blog anda. Btw dah punya blog belum ?? :D kalo belum punya ya buat dulu, kalo belum tahu cara membuat blog ya parah dah :P ya kapan kapan ku posting dah, y'know i'm a business man alis sok sibuk :P.
2. Kalo sudah login ke blog anda klik
tab design -> klik edit HTML. copykan kode kode berikut :
Kode SyntaxHighlighter.
<link href='http://h1.ripway.com/wahyueko/blog/styles/shCoreDefault.css' rel='stylesheet' type='text/css'> </link>
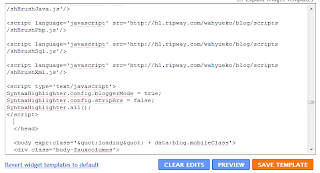
Copykan kode SyntaxHighlighter antara "<head> dan </head>" pada template blog anda
     <head>
        Copykan kode SyntaxHighlighter diatas disini
       </head>
Klik aja gambar berikut untuk lebih jelas dalam penempatan kode SyntaxHighlighter :
3. Setelah selesai simpan templatenya and done.
4. Saatnya buat postingan baru :p klik tab posting pada blog anda
lets have little fun by writing funny code.
go ahead copy paste codes bellow for new posting:
contoh pertama :
     <?
       echo "my name is rasta";
    ?>
Contoh ke-dua:
       <pre class="brush: php; highlight: [5, 15]; html-script: true">
       <!DOCTYPE html PUBLIC "-//W3C//DTD XHTML 1.0 Strict//EN" "http://www.w3.org/TR/xhtml1/DTD/xhtml1-strict.dtd">
       <html xmlns="http://www.w3.org/1999/xhtml" xml:lang="en" lang="en">
       <head>
        <meta http-equiv="Content-Type" content="text/html; charset=UTF-8" />
        <title>SyntaxHighlighter Demo Page - <?= htmlspecialchars($title) ?></title>
       </head>

       <body>

       <?
       /***********************************
        ** Multiline block comments
        **********************************/

       $stringWithUrl = "http://alexgorbatchev.com";
       $stringWithOutUrl = 'hello world';

       ob_start("parseOutputBuffer");  // Start Code Buffering
       session_start();

       function parseOutputBuffer($buf) {
        global $portal_small_code, $portal_gzcompress;
        global $PHP_SELF, $HTTP_ACCEPT_ENCODING;

        // cleaning out the code.
        if($portal_small_code && !$portal_gzcompress) {
         $buf = str_replace(" ", "", $buf);
         $buf = str_replace("\n", "", $buf);
         $buf = str_replace(chr(13), "", $buf);
        }
       }

       ?>

       <!-- Lorem ipsum dolor sit amet, consectetur adipisicing elit, sed do eiusmod tempor incididunt ut labore et dolore magna aliqua. Ut enim ad minim veniam, quis nostrud exercitation ullamco laboris nisi ut aliquip ex ea commodo consequat. Duis aute irure dolor in reprehenderit in voluptate velit esse cillum dolore eu fugiat nulla pariatur. Excepteur sint occaecat cupidatat non proident, sunt in culpa qui officia deserunt mollit anim id est laborum. -->

       </body>
       </html>
       </pre>
O iya sebelum lupa tata cara penulisan SyntaxHighlighter adalah
<pre class='brush: language'>
     ketikkan kode disini
</pre>
Language pada kode diatas harus diganti dengan
1. php untuk kode kode php
2. java untuk kode kode java
3. xml untuk kode kode xml
Exception jika sintak sintak HTML seperti head, body, html dll, muncul error
ketikkan
<body> diganti dengan

sudah dulu jika bermanfaat jangan lupa commentnya ya.. biar kita saling sharing ilmu :P


